Unsheathed Line Notice
FOR ALL GLIDERS WITH UNSHEATHED LINE SETS
(ESPECIALLY EARLY PRODUCTION MODELS OF DELTA 2)
UNSHEATHED LINE CHECK
Some pilots have noticed a slight disfigurement of their riser lines at the maillon, or the mid-stabilo line (On the D2, at junction CRL4 / CRU4). The issue shown in the photos here does not affect the airworthiness of the glider or the line strength. This line is visually irritating, but not a safety issue and is the result of us having over-engineered this part of the wing. If you have noticed this on your wing, then you may take your wing back to your dealer and they will remove this line for you following the steps outlined below. Also, if you feel comfortable with the procedure, you may do so yourself. Please read on for a detailed explanation:
WHAT HAPPENED TO THIS LINE?
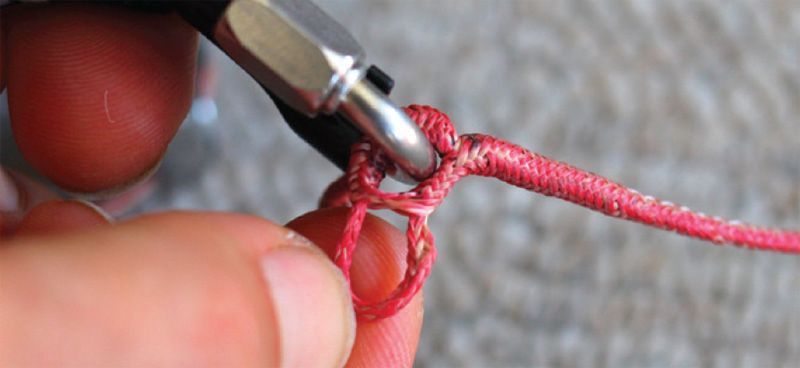
In order to obtain better breaking strengths at line-to-line junctions, we increase the diameter of the lines where they connect to each other by inserting a short section of line at the loop. This segment is only needed at the line to line junction. It is not needed on the loop which attaches to the maillon. However, some early production models may have the segments inserted at both ends of the riser lines (this is to simplify production). At the maillon, there is no strength difference with or without the segment of line inside the loop. Therefore, if you see this segment working its way out of the loop at the maillon as is shown in the photos, do not be concerned. Your lines do not need to be changed because of this disfiguration.
HOW CAN IT BE PREVENTED?
Do not compress or deform the maillon loops when launching or ground handling.
WHAT TO DO IF YOU SEE THIS AT THE MAILLON END OF YOUR LINE?
You have 3 choices:
- Don’t do anything. You can fly with the loops like they are shown in the photos here, as there is no loss in strength at all. Or, if you don’t like the way it looks, then:
- Take your wing back to your OZONE Dealer, who will remove this extra and unnecessary line. The protruding line must be removed, very gently. Very carefully, work the segment out a few millimeters more on each side. To do this, the main line might need to be compressed lengthwise. Then, using sharp scissors, cut the inside line close to where it exits from the main line. Be very careful during this operation to not pull out or cut any of the main line fiber! We repeat, you MUST NOT CUT OR DAMAGE THE MAIN LINE IN THIS PROCESS.
- Although we recommend having an OZONE dealer perform this operation, pilots who are very familiar with paraglider construction may perform the adjustment themselves. If you are at all uncertain, please seek assistance from a certified paraglider check facility.

